How to Add Image with Rounded Corners in Android Jetpack Compose
In modern UI/UX design, rounded corners are more than just a trend; they add aesthetic appeal to your application. In this extended tutorial, you’ll learn not only how to round off those sharp corners of an image in Jetpack Compose but also why it’s beneficial to do so.
Why Rounded Corners?
Rounded corners make an app feel more approachable and user-friendly. The soft edges can also help guide the user’s eyes, creating a smoother navigation experience. They can be especially useful in drawing attention to specific UI elements, like images and buttons.
Key Components to Consider
You’ll need two primary components for this:
ImageComposable: To display the image.RoundedCornerShape: To apply the rounded shape to the image.
Code Snippet
Here’s how to use these components together. The following Kotlin code illustrates this:
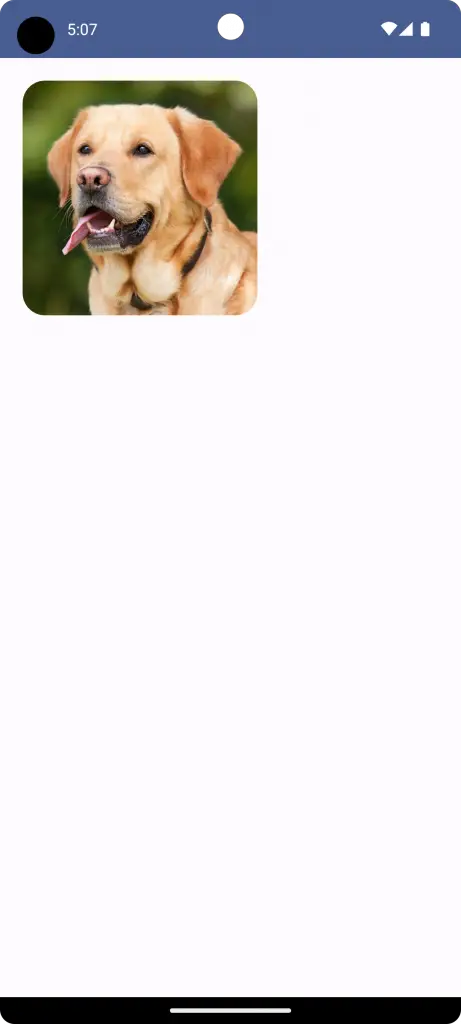
@Composable
fun ImageExample() {
    Image(
        painter = painterResource(R.drawable.pet),
        contentDescription = null,
        contentScale = ContentScale.Crop,
        modifier = Modifier
            .size(250.dp)
            .padding(20.dp)
            .clip(RoundedCornerShape(20.dp))
    )
}
Step-by-Step Implementation
- Import the Required Packages: Make sure you have the required packages for Jetpack Compose, Image, and Modifier.
- Initialize the
ImageComposable: Use theImagecomposable to load your drawable resource. - Apply the Modifier: Use the
clipmethod withRoundedCornerShapeto apply rounded corners. - Set the Dimensions: Use
.size()to specify the size of the image. - Additional Styling: Optionally, you can add padding or borders.
Complete Code Walkthrough
Let’s dive deeper into the full code example:
package com.codingwithrashid.myapplication

import android.os.Bundle
import androidx.activity.ComponentActivity
import androidx.activity.compose.setContent
import androidx.compose.foundation.Image
import androidx.compose.foundation.layout.Column
import androidx.compose.foundation.layout.fillMaxSize
import androidx.compose.foundation.layout.padding
import androidx.compose.foundation.layout.size
import androidx.compose.foundation.shape.RoundedCornerShape
import androidx.compose.material3.MaterialTheme
import androidx.compose.material3.Surface
import androidx.compose.runtime.Composable
import androidx.compose.ui.Modifier
import androidx.compose.ui.draw.clip
import androidx.compose.ui.layout.ContentScale
import androidx.compose.ui.res.painterResource
import androidx.compose.ui.unit.dp
import com.codingwithrashid.myapplication.ui.theme.MyApplicationTheme

class MainActivity : ComponentActivity() {
    override fun onCreate(savedInstanceState: Bundle?) {
        super.onCreate(savedInstanceState)
        setContent {
            MyApplicationTheme {
                Surface(
                    modifier = Modifier.fillMaxSize(),
                    color = MaterialTheme.colorScheme.background
                ) {
                    Column {
                        ImageExample()
                    }
                }
            }
        }
    }
}

@Composable
fun ImageExample() {
        Image(
            painter = painterResource(R.drawable.pet),
            contentDescription = null,
            contentScale = ContentScale.Crop,
            modifier = Modifier
                .size(250.dp)
                .padding(20.dp)
                .clip(RoundedCornerShape(20.dp))
        )
}
Here we initialize the MainActivity and set the content using the setContent method. We apply our ImageExample within a Surface to ensure it inherits any background color from the theme.
Additional Features and Enhancements
You aren’t limited to just rounded corners. Jetpack Compose offers various other shape modifications, like circles or ovals, and even custom shapes. You can also add a border using the .border() modifier if you wish to make the image more distinctive.
Understanding how to implement rounded corners in Jetpack Compose is more than just about aesthetics. It’s about enhancing the overall user experience. By following this tutorial, you’ve added a polished touch to your application, making it more inviting and engaging.