How to Create Radial Gradient in Android Jetpack Compose
When it comes to spicing up your UI, gradients can provide a pleasing aesthetic that adds depth and vibrancy to your app. Among the different types of gradients, radial gradients can especially make your UI elements stand out.
In this blog post, we will focus on creating and utilizing radial gradients in Android development with Jetpack Compose.
How to Create Radial Gradient
Radial gradients define a gradient in a circular manner, providing a smooth transition of colors emanating from a central point. They can be created using the Brush.radialGradient function in Jetpack Compose.
A simple radial gradient that transitions from red to blue can be defined as:
val gradient = Brush.radialGradient(
colors = listOf(Color.Red, Color.Blue)
)
In this example, the gradient starts from red at the center and transitions to blue towards the edges.
For more advanced customization, you can specify the center and radius of the radial gradient:
val gradient = Brush.radialGradient(
colors = listOf(Color.Red, Color.Blue),
center = Offset(100f, 100f),
radius = 200f
)
In this snippet, we define a radial gradient that starts with red and transitions to blue. The gradient’s center is positioned at Offset(100f, 100f), and the radius of the gradient circle is set to 200f.
Just like linear gradients, Jetpack Compose also allows you to define the position of each color along the radius using color-stop pairs:
val gradient = Brush.radialGradient(
colorStops = arrayOf(
0.0f to Color.Red,
0.5f to Color.Green,
1.0f to Color.Blue
),
center = Offset(100f, 100f),
radius = 200f
)
In this radial gradient, the color starts with Red at the center (0.0f), transitions to Green at the midpoint of the radius (0.5f), and finally to Blue at the edge (1.0f).
How to Use Radial Gradient
Once your gradient is defined, you can apply it to any composable that takes a Brush parameter. For instance, to set the background of a Box:
@Composable
fun GradientExample() {
    val gradient = Brush.radialGradient(
        colors = listOf(Color.Red, Color.Blue)
    )
        Box(modifier = Modifier.fillMaxSize()
            .background(gradient))
}
Here, we utilize the Modifier.background function to apply our gradient as the Box’s background, while the Modifier.fillMaxSize() ensures the Box expands to fill all available space.
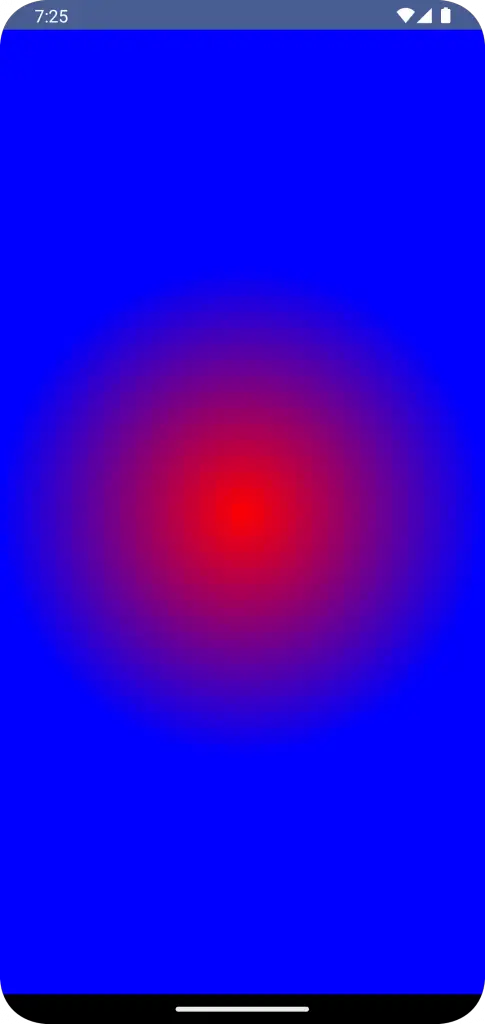
Following is the output.
Following is the complete code for reference.
package com.example.example

import android.os.Bundle
import androidx.activity.ComponentActivity
import androidx.activity.compose.setContent
import androidx.compose.foundation.background
import androidx.compose.foundation.layout.Box
import androidx.compose.foundation.layout.fillMaxSize
import androidx.compose.material3.MaterialTheme
import androidx.compose.material3.Surface
import androidx.compose.runtime.Composable
import androidx.compose.ui.Modifier
import androidx.compose.ui.graphics.Brush
import androidx.compose.ui.graphics.Color
import androidx.compose.ui.tooling.preview.Preview
import com.example.example.ui.theme.ExampleTheme

class MainActivity : ComponentActivity() {
    override fun onCreate(savedInstanceState: Bundle?) {
        super.onCreate(savedInstanceState)
        setContent {
            ExampleTheme {
                // A surface container using the 'background' color from the theme
                Surface(
                    modifier = Modifier.fillMaxSize(),
                    color = MaterialTheme.colorScheme.background
                ) {
                    GradientExample()
                }
            }
        }
    }
}

@Composable
fun GradientExample() {
    val gradient = Brush.radialGradient(
        colors = listOf(Color.Red, Color.Blue)
    )
        Box(modifier = Modifier.fillMaxSize()
            .background(gradient))
}

@Preview(showBackground = true)
@Composable
fun ExamplePreview() {
    ExampleTheme {
        GradientExample()
    }
}
With Jetpack Compose, creating radial gradients is an effortless task. They offer a unique way to enhance your app’s visual appearance, adding an appealing depth and a vibrant color transition.