How to Change Material3 Version of Your Android Project
Material Design has been a cornerstone in Android app development, offering a comprehensive guide for visual, motion, and interaction design across platforms and devices.
Google’s introduction of Material3 brought in more flexibility, customization options, and new components. Updating or changing the Material3 version in your Android project can bring new features and improvements to your app.
This blog post will guide you through the process of changing the Material3 version in your Android project.
Steps to Change Material3 Version
Prepare Your Project
Before updating Material3, ensure your project is ready. This means having the latest stable version of Android Studio and ensuring your project is already using or is compatible with Material3.
Update build.gradle
The build.gradle.kts (Module: app) file in your Android project specifies dependencies for your project. To change the Material3 version, you need to update the dependency in this file.
- Open the
build.gradle(Module: app) file in your Android project. - Find the Material3 dependency line. It should look something like this:
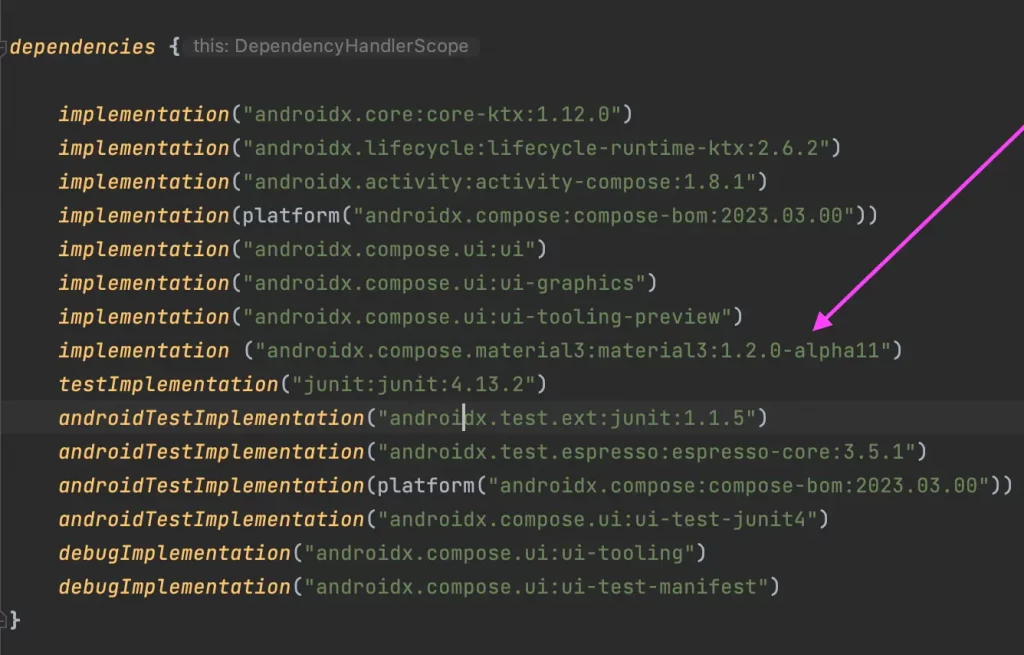
implementation("androidx.compose.material3:material3")- Go here and check the latest version of Compose Material 3. Then add the version number. For example, if you want to upgrade to version ‘1.2.0-alpha11‘, the line would look like:
implementation ("androidx.compose.material3:material3:1.2.0-alpha11")- Save the file.

Sync the Project
After updating the build.gradle file, you need to sync your project with the new gradle files.
- Click on ‘Sync Now’ in the bar that appears at the top of Android Studio.
- Wait for Android Studio to finish syncing. It might take a few minutes depending on the size of your project and the speed of your internet connection.
Verify and Test
Once the sync is complete, it’s crucial to verify that the update was successful and that it didn’t break any existing functionality.
- Run your app to ensure that it compiles and runs with the updated Material3 version.
- Test different components and UI elements to ensure they work as expected with the new Material3 version.
Best Practices
- Backup First: Always back up your project before making changes to dependencies. This way, you can easily revert if something goes wrong.
- Read the Release Notes: Before updating, read the release notes for the new version of Material3. They may include important information about new features, bug fixes, and potential breaking changes.
- Test Thoroughly: Thoroughly test your app on different devices and API levels to ensure compatibility and to check that all functionalities work as expected.
Updating the Material3 version in your Android project can bring in new design features and improvements. By following the steps outlined in this guide, you can seamlessly update the Material3 version and take advantage of the latest advancements in Material Design.


