How to Set JDK Location in Android Studio
As Android developers, we require the Java Development Kit (JDK) to build our Android applications. It serves as a software environment that offers numerous tools essential for the development process. Among these tools, you’ll find the Java Runtime Environment (JRE) and the Java compiler, both vital to your software projects.
In this blog post, we’ll show you how to set the JDK location in Android Studio. While Android Studio usually manages the JDK automatically, there can be instances where you need to specify or change the JDK location manually. Whether you’re a seasoned Android developer or a beginner just starting, this guide should help you get through this process.
Prerequisites
To follow along, you should have:
- Android Studio installed on your machine.
- A version of the JDK installed on your computer.
How to Change JDK Location in Android Studio
Follow the steps below to set the JDK location in Android Studio:
Step 1: Open Android Studio
Start Android Studio on your machine. If you don’t have a project open, it will load to the Welcome to Android Studio window.
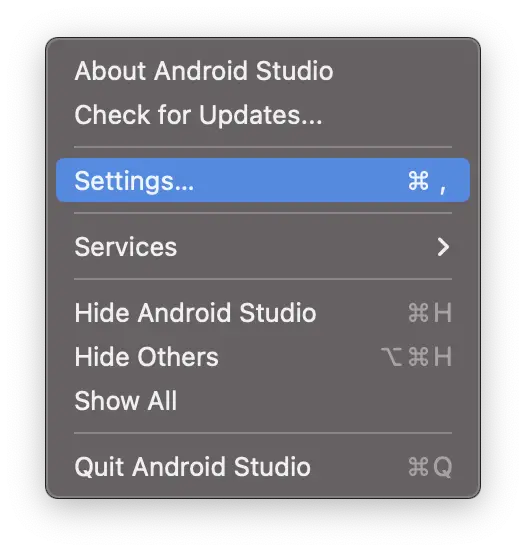
Step 2: Access the Project Structure
Once Android Studio is open, go to the top menu and select Android Studio > Settings.
Step 3: Navigate to SDK Location
In the Project Structure dialog box that opens, you will find a number of options on the left side. Click on Build, Execution, Deployement option, then select Build Tools, and finally click on the Gradle option.
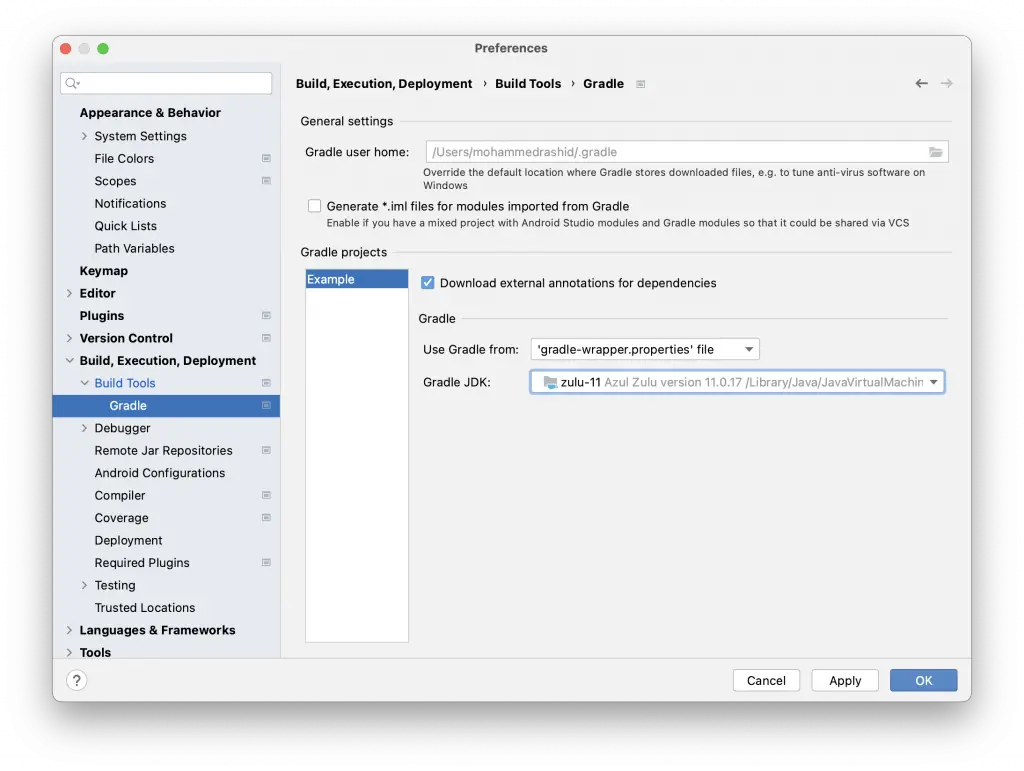
Step 4: Set the JDK Location
Here, you will see a field named Gradle JDK. This is where you can specify the path to your installed JDK. If you need to change the location, simply click on the dropdown. It will allow you to browse through all detected JDKs on your computer.
Step 5: Save Your Changes
After you’ve selected your JDK directory, click Apply and then OK. Android Studio will now use the JDK located in the specified directory for your projects.
Setting the JDK location in Android Studio can be a simple yet essential task. It ensures that your development environment is correctly configured, and your Android applications are built using the desired JDK.
It’s important to note that Android Studio typically handles the JDK configuration automatically, so this task isn’t usually required. However, understanding how to do this manually can be particularly helpful in cases where you need to switch between different JDK versions or if you’re troubleshooting build issues.
Hopefully, this guide has helped demystify the process of setting the JDK location in Android Studio. Happy coding!