How to Create LazyVGrid with Sticky Header in iOS SwiftUI
In this blog post, we’ll delve into an important aspect of SwiftUI: implementing a LazyVGrid with a sticky header.
This is a topic that often stirs the curiosity of app developers, so we’ll break down the process for you using a simple, understandable example.
LazyVGrid Overview
The SwiftUI framework introduced LazyVGrid as a method to organize data in a grid format. This format is much like UICollectionView in UIKit. The concept behind a “lazy” view is that the grid will only render what is visible to the user.
This is a performance optimization, particularly handy when dealing with large amounts of data.
SwiftUI Example with LazyVGrid and Sticky Header
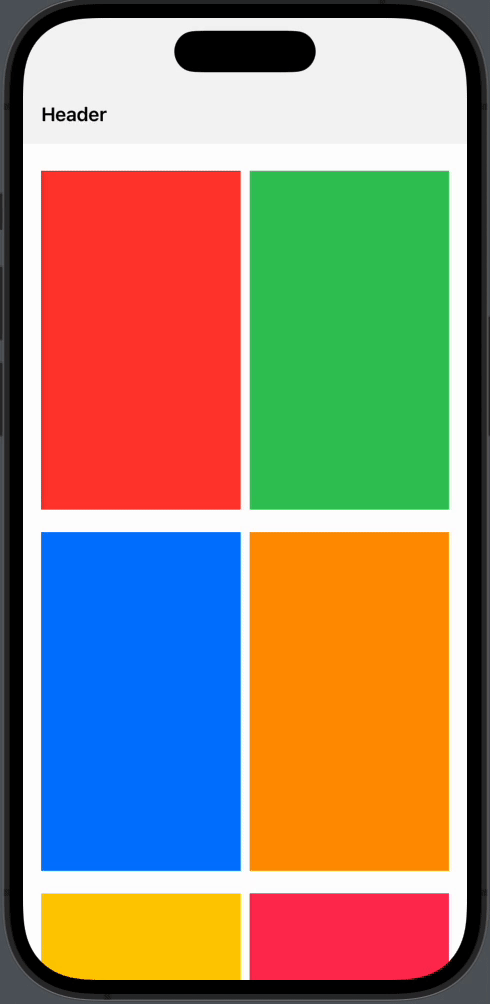
Now let’s see how to add a sticky header to a LazyVGrid in SwiftUI. In our example, we are using an array of colors, which are displayed in a LazyVGrid with two columns.
struct ContentView: View {
    let columns = [
        GridItem(.flexible()),
        GridItem(.flexible())
    ]
    let colors: [Color] = [.red, .green, .blue, .orange, .yellow, .pink, .purple, .gray]

    var body: some View {
        VStack {
            HStack {
                Text("Header")
                    .font(.headline)
                    .foregroundColor(.black)
                    .padding()
                Spacer()
            }
            .background(Color.gray.opacity(0.1))

            ScrollView {
                LazyVGrid(columns: columns, spacing: 20) {
                    ForEach(colors, id: \.self) { color in
                        Rectangle()
                            .fill(color)
                            .frame(height: 300)
                    }
                }
                .padding()
            }
        }
    }
}
The VStack arranges its children in a vertical line. Within it, the HStack contains our header. We used the .headline font and .black color for the Text, while the Spacer ensures it stays left aligned.
Next, we added a ScrollView which contains the LazyVGrid. Inside this grid, we iterate over the colors array to generate rectangular views filled with different colors. The .padding() modifier adds some space around the grid.
The “sticky” effect is achieved by placing the header outside the ScrollView. Since the ScrollView only manages the content inside it, the header remains stationary, hence creating the “sticky” effect.
This example shows a very basic sticky header implementation. The “Header” text appears above the LazyVGrid and stays visible even as you scroll through the grid.
SwiftUI’s LazyVGrid and ScrollView give us a simple way to create a sticky header. Though it’s a straightforward solution, remember that more complex scenarios may require other methods. Always take the time to assess the needs of your application before deciding on the best approach.