How to Adjust Button Size in iOS SwiftUI
In this blog post, we’ll focus on a key aspect of user interactivity in SwiftUI – customizing button sizes. Buttons are pivotal elements in mobile apps, driving user interactions and actions. SwiftUI provides a comprehensive and flexible system to design buttons that align perfectly with your app’s style and usability needs.
Let’s explore how to customize the size of buttons in SwiftUI.
Basics: SwiftUI Button
Before diving into adjusting the size, let’s take a brief look at how a basic button is created in SwiftUI:
Button(action: {
    // Your action code here
}) {
    Text("Hello, SwiftUI!")
}
In this simple setup, the Button view takes two primary arguments – an action and a label. The action is what happens when users tap the button, and the label defines what users see.
Adjust Button Size
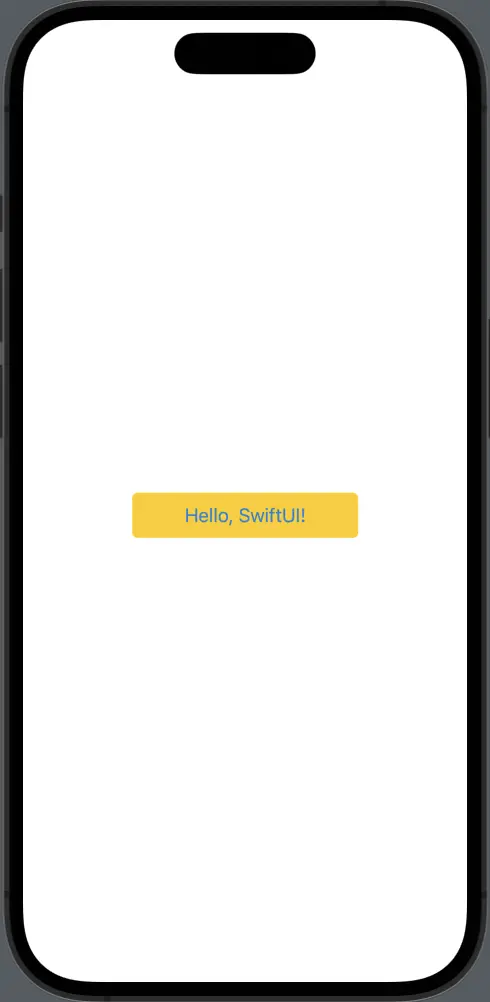
In SwiftUI, there is no direct property or modifier available to set the size of a button. Instead, we manipulate the size by applying modifiers to the button’s label. Two of the most common modifiers are .frame() and .padding():
Button(action: {
            // Your action code here
        }) {
            Text("Hello, SwiftUI!")
                .frame(width: 200, height: 40)
                .background(.yellow)
                .cornerRadius(5)
        }
In this example, the .frame() modifier is used to directly set the width and height of the button.
Using Flexible Frames
In cases where you want your button to adapt its size based on its container, you can use min, ideal, and max size parameters:
Button(action: {
    // Your action code here
}) {
    Text("Hello, SwiftUI!")
        .frame(minWidth: 100, idealWidth: 200, maxWidth: .infinity, minHeight: 40, idealHeight: 60, maxHeight: 80)
        .padding()
}
This code creates a button that has a minimum width of 100 points, an ideal width of 200 points, and can expand to take up all available width due to maxWidth: .infinity. Similarly, the button’s height will vary between 40 and 80 points, ideally being 60 points.
Design With Padding
Another approach to control the size of a button is to use padding. This is particularly useful when you want to create buttons with more touch area:
Button(action: {
    // Your action code here
}) {
    Text("Hello, SwiftUI!")
        .padding(.all, 20)
}
This example creates a button with padding of 20 points on all sides, making the button larger and easier to tap.
In SwiftUI, customizing button sizes revolves around modifying the label’s frame and padding. By understanding these concepts, you can create buttons of any size that perfectly suit your application’s design and interaction needs. Stay tuned for more SwiftUI explorations.