How to Add Border to LazyHGrid in iOS SwiftUI
In this blog post, we will discuss a common requirement in SwiftUI: adding a border to a LazyHGrid. This post will guide you through the process with an easy-to-follow example.
LazyHGrid Overview
In SwiftUI, LazyHGrid is used for creating horizontal grid layouts. It offers a simple and efficient way to create grids that adapt to various screen sizes and orientations.
The “lazy” aspect means that the grid only creates items as they appear on screen. This provides a significant performance boost, especially when dealing with large amounts of data.
Add Border to a LazyHGrid
While SwiftUI provides a direct way to add a border to individual views, things can get a little tricky when it comes to adding a border around the whole LazyHGrid. Let’s explore this with an example:
SwiftUI LazyHGrid Border Example
struct ContentView: View {
    let rows = [
        GridItem(.flexible()),
        GridItem(.flexible())
    ]

    var body: some View {
        ScrollView(.horizontal) {
            LazyHGrid(rows: rows, spacing: 20) {
                ForEach(1...10, id: \.self) { index in
                    Text("\(index)")
                        .frame(width: 100, height: 100)
                        .background(Color.blue)
                        .cornerRadius(10)
                }
            }
            .padding()
            .border(Color.red, width: 5)
        }
    }
}
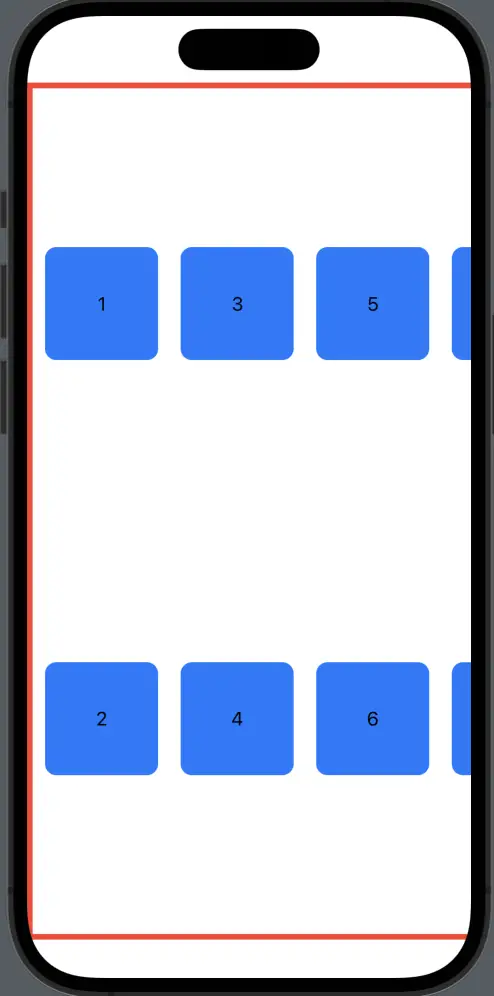
In the above example, we created a LazyHGrid with two rows and added numbers from 1 to 10 as Text views. Each Text view has a fixed width and height of 100 and is displayed with a blue background and rounded corners.
The .padding() modifier is applied to the LazyHGrid, which adds space around the grid. This is crucial because the .border(Color.red, width: 5) modifier, which follows it, uses this space to draw the border. This way, the border does not overlap with the grid items.
SwiftUI’s LazyHGrid offers a lot of flexibility and efficiency when displaying data in a horizontal grid. Adding a border around the whole grid can enhance its appearance and distinguish it from other parts of the user interface. Remember to consider the order of the modifiers to ensure your border and padding look just right.
