How to Show Data as a Table in Flutter
What makes Flutter so unique is its extremely useful widgets. The ready-made widgets save development time as developers don’t need to create components from scratch. In this blog post, let’s see how to create a table with given data in Flutter.
We use the DataTable widget to show data as a table in Flutter.
It helps to arrange its children in a row and column manner. We use DataColumn to create columns whereas DataRow is used to create rows.
DataTable(
          border: TableBorder.all(width: 1),
          columns: const <DataColumn>[
            DataColumn(
              label: Text(
                'Name',
                style: TextStyle(fontStyle: FontStyle.italic),
              ),
            ),
            DataColumn(
              label: Text(
                'Age',
                style: TextStyle(fontStyle: FontStyle.italic),
              ),
              numeric: true,
            ),
            DataColumn(
              label: Text(
                'Role',
                style: TextStyle(fontStyle: FontStyle.italic),
              ),
            ),
          ],
          rows: const <DataRow>[
            DataRow(
              cells: <DataCell>[
                DataCell(Text('Ravi')),
                DataCell(Text('19')),
                DataCell(Text('Student')),
              ],
            ),
            DataRow(
              cells: <DataCell>[
                DataCell(Text('Jane')),
                DataCell(Text('43')),
                DataCell(Text('Professor')),
              ],
            ),
            DataRow(
              cells: <DataCell>[
                DataCell(Text('William')),
                DataCell(Text('27')),
                DataCell(Text('Professor')),
              ],
            ),
          ],
        ),
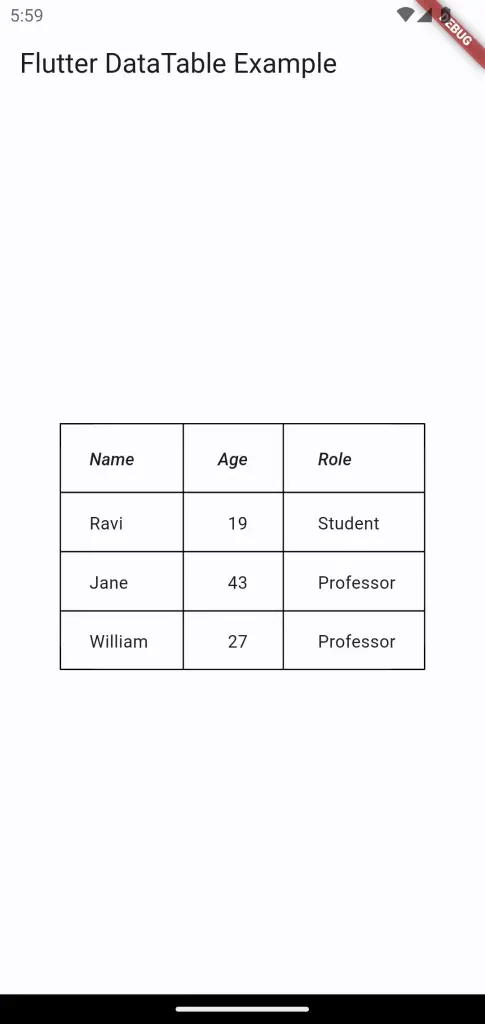
The above code creates a DataTable widget, which is used to display data in a tabular format. The table has a border with a width of 1, and 3 columns labeled “Name”, “Age”, and “Role”. The “Age” column is also marked as numeric.
The table also has 3 rows of data, each with 3 cells containing the name, age, and role of an individual. The rows are defined as with cells and in each cell, the data is wrapped with text widget.
You will get the following output.

Following is the complete Flutter Data Table example.
import 'package:flutter/material.dart';

void main() {
  runApp(const MyApp());
}

class MyApp extends StatelessWidget {
  const MyApp({super.key});

  // This widget is the root of your application.
  @override
  Widget build(BuildContext context) {
    return MaterialApp(
      title: 'Flutter Demo',
      theme: ThemeData(
        useMaterial3: true,
        colorSchemeSeed: Colors.blue,
      ),
      home: const MyHomePage(),
    );
  }
}

class MyHomePage extends StatelessWidget {
  const MyHomePage({super.key});

  @override
  Widget build(BuildContext context) {
    return Scaffold(
      appBar: AppBar(
        title: const Text('Flutter DataTable Example'),
      ),
      body: Center(
        child: DataTable(
          border: TableBorder.all(width: 1),
          columns: const <DataColumn>[
            DataColumn(
              label: Text(
                'Name',
                style: TextStyle(fontStyle: FontStyle.italic),
              ),
            ),
            DataColumn(
              label: Text(
                'Age',
                style: TextStyle(fontStyle: FontStyle.italic),
              ),
              numeric: true,
            ),
            DataColumn(
              label: Text(
                'Role',
                style: TextStyle(fontStyle: FontStyle.italic),
              ),
            ),
          ],
          rows: const <DataRow>[
            DataRow(
              cells: <DataCell>[
                DataCell(Text('Ravi')),
                DataCell(Text('19')),
                DataCell(Text('Student')),
              ],
            ),
            DataRow(
              cells: <DataCell>[
                DataCell(Text('Jane')),
                DataCell(Text('43')),
                DataCell(Text('Professor')),
              ],
            ),
            DataRow(
              cells: <DataCell>[
                DataCell(Text('William')),
                DataCell(Text('27')),
                DataCell(Text('Professor')),
              ],
            ),
          ],
        ),
      ),
    );
  }
}
This Flutter tutorial shows a pretty basic Table structure. There are many other features available for the Flutter Table widget, as you see in this video.
In conclusion, displaying data in a tabular format can be easily accomplished in Flutter using the DataTable widget. This widget allows for the creation of tables with customizable borders, columns, and rows.
