How to Align Row Items Left and Right in Flutter
When developing a user interface with Flutter, alignment plays a critical role in delivering a clear and functional layout. Specifically, within a Row, you may want widgets to align to the left, to the right, or both. Flutter provides a way to manage these alignments easily.
Let’s explore three practical examples to align children within a Row.
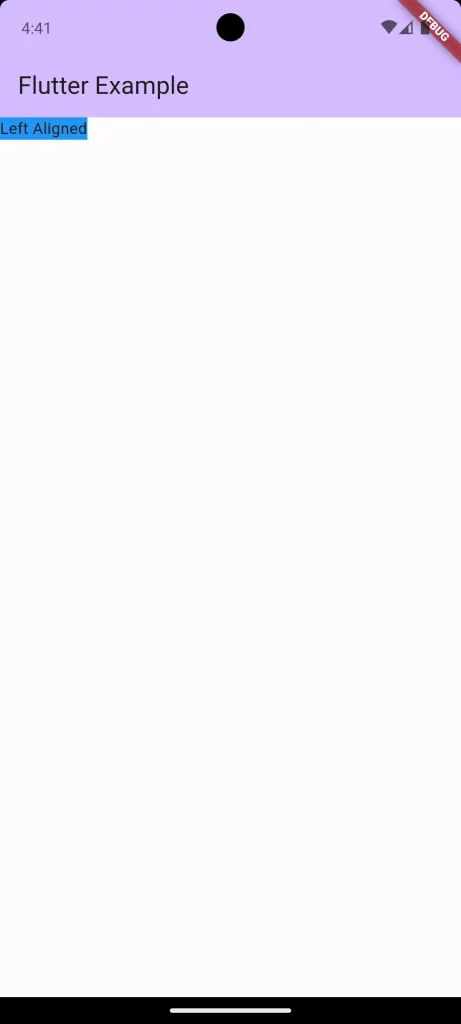
Align Child to Left in a Row
To align a child widget to the left within a Row, you can use the mainAxisAlignment property set to MainAxisAlignment.start. This aligns the child to the start of the main axis, which, in a Row, is horizontal.
Row(
  mainAxisAlignment: MainAxisAlignment.start,
  children: <Widget>[
    Container(
      color: Colors.blue,
      child: const Text('Left Aligned'),
    )
  ],
)
In this example, the Text widget within the Container is aligned to the left side of the Row.
Align Child to Right in a Row
Aligning a child to the right is similarly straightforward. Set the mainAxisAlignment property to MainAxisAlignment.end.
Row(
  mainAxisAlignment: MainAxisAlignment.end,
  children: <Widget>[
    Container(
      color: Colors.red,
      child: const Text('Right Aligned'),
    ),
  ],
)
Now, the Text widget is aligned to the right end of the Row.
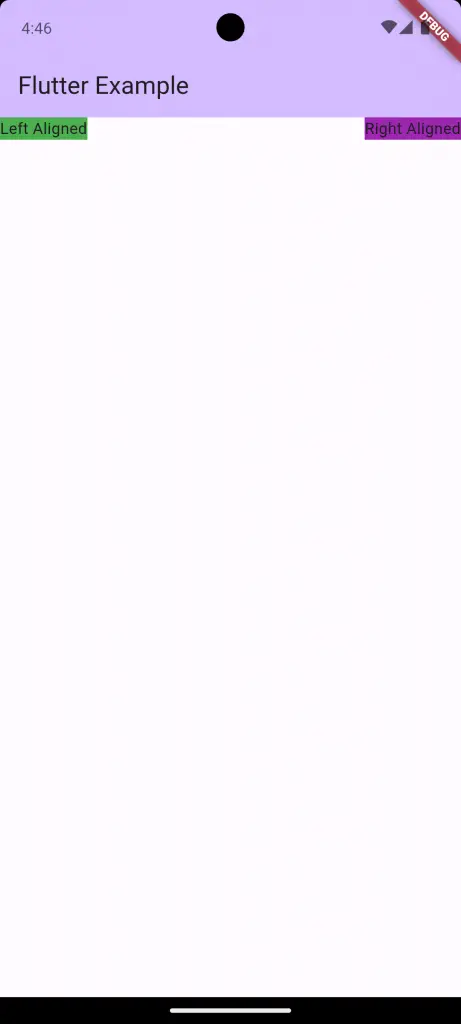
Align Two Children to Left and Right
To align one child to the left and another to the right within the same Row, you can use MainAxisAlignment.spaceBetween.
Row(
  mainAxisAlignment: MainAxisAlignment.spaceBetween,
  children: <Widget>[
    Container(
      color: Colors.green,
      child: const Text('Left Aligned'),
    ),
    Container(
      color: Colors.purple,
      child: const Text('Right Aligned'),
    ),
  ],
)
In this scenario, the mainAxisAlignment property spaces out the children evenly, with the first child being at the start and the last at the end of the Row. The Container widgets act as the children here, each containing a Text widget.
Following is the complete code for reference.
import 'package:flutter/material.dart';

void main() {
  runApp(const MyApp());
}

class MyApp extends StatelessWidget {
  const MyApp({super.key});

  @override
  Widget build(BuildContext context) {
    return MaterialApp(
      title: 'Flutter Demo',
      theme: ThemeData(
        colorScheme: ColorScheme.fromSeed(seedColor: Colors.deepPurple),
        useMaterial3: true,
      ),
      home: const MyHomePage(),
    );
  }
}

class MyHomePage extends StatelessWidget {
  const MyHomePage({super.key});

  @override
  Widget build(BuildContext context) {
    return Scaffold(
        appBar: AppBar(
          backgroundColor: Theme.of(context).colorScheme.inversePrimary,
          title: const Text(
            'Flutter Example',
          ),
        ),
        body: Row(
          mainAxisAlignment: MainAxisAlignment.spaceBetween,
          children: <Widget>[
            Container(
              color: Colors.green,
              child: const Text('Left Aligned'),
            ),
            Container(
              color: Colors.purple,
              child: const Text('Right Aligned'),
            ),
          ],
        ));
  }
}
Alignment in Flutter’s Row widget can be managed effectively using the MainAxisAlignment property. Whether you’re aligning a single child or organizing multiple widgets, understanding these layout mechanisms is key to crafting polished and user-friendly interfaces.
These examples serve as a template for your Flutter applications, ensuring that regardless of the content, your widgets will be exactly where you want them, creating a balanced and intuitive layout for your users.