How to Align Radio Buttons in Row in Flutter
Radio buttons are one of the commonly used UI components to enter a single option from multiple choices. In this Flutter tutorial, let’s learn how to add radio buttons in a row.
The Radio Button can be aligned either column-wise or row-wise. In order to align them in a row, you have to use the Row widget as the parent widget.
See the code snippet given below.
Row(
children: <Widget>[
Expanded(
child: ListTile(
contentPadding: const EdgeInsets.all(0),
title: const Text('Giraffe'),
leading: Radio<Animals>(
value: Animals.giraffe,
groupValue: _animal,
onChanged: (Animals? value) {
setState(() {
_animal = value;
});
debugPrint(_animal!.name);
},
),
)),
Expanded(
child: ListTile(
contentPadding: const EdgeInsets.all(0),
title: const Text('Lion'),
leading: Radio<Animals>(
value: Animals.lion,
groupValue: _animal,
onChanged: (Animals? value) {
setState(() {
_animal = value;
});
debugPrint(_animal!.name);
},
),
),
),
Expanded(
child: ListTile(
contentPadding: const EdgeInsets.all(0),
title: const Text('Tiger'),
leading: Radio<Animals>(
value: Animals.tiger,
groupValue: _animal,
onChanged: (Animals? value) {
setState(() {
_animal = value;
});
debugPrint(_animal!.name);
},
),
),
)
],
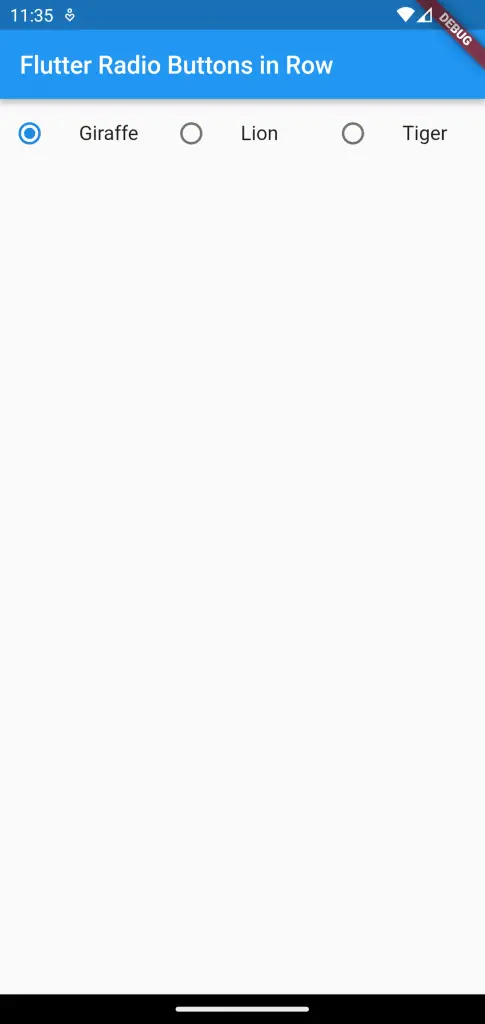
)Here, there are three radio buttons aligned in a row.
See the following output.
Following is the complete code of this Flutter radio button example.
import 'package:flutter/material.dart';

void main() {
  runApp(const MyApp());
}

class MyApp extends StatelessWidget {
  const MyApp({super.key});

  @override
  Widget build(BuildContext context) {
    return MaterialApp(
      title: 'Flutter Demo',
      theme: ThemeData(
        primarySwatch: Colors.blue,
      ),
      home: const MyHomePage(),
    );
  }
}

class MyHomePage extends StatelessWidget {
  const MyHomePage({super.key});

  @override
  Widget build(BuildContext context) {
    return Scaffold(
        appBar: AppBar(
          title: const Text('Flutter Radio Buttons in Row'),
        ),
        body: const MyStatefulWidget());
  }
}

enum Animals { giraffe, lion, tiger }

class MyStatefulWidget extends StatefulWidget {
  const MyStatefulWidget({super.key});

  @override
  State<MyStatefulWidget> createState() => _MyStatefulWidgetState();
}

class _MyStatefulWidgetState extends State<MyStatefulWidget> {
  Animals? _animal = Animals.giraffe;
  @override
  Widget build(BuildContext context) {
    return Row(
      children: <Widget>[
        Expanded(
            child: ListTile(
          contentPadding: const EdgeInsets.all(0),
          title: const Text('Giraffe'),
          leading: Radio<Animals>(
            value: Animals.giraffe,
            groupValue: _animal,
            onChanged: (Animals? value) {
              setState(() {
                _animal = value;
              });
              debugPrint(_animal!.name);
            },
          ),
        )),
        Expanded(
          child: ListTile(
            contentPadding: const EdgeInsets.all(0),
            title: const Text('Lion'),
            leading: Radio<Animals>(
              value: Animals.lion,
              groupValue: _animal,
              onChanged: (Animals? value) {
                setState(() {
                  _animal = value;
                });
                debugPrint(_animal!.name);
              },
            ),
          ),
        ),
        Expanded(
          child: ListTile(
            contentPadding: const EdgeInsets.all(0),
            title: const Text('Tiger'),
            leading: Radio<Animals>(
              value: Animals.tiger,
              groupValue: _animal,
              onChanged: (Animals? value) {
                setState(() {
                  _animal = value;
                });
                debugPrint(_animal!.name);
              },
            ),
          ),
        )
      ],
    );
  }
}
That’s how you add radio buttons in rows in Flutter.