How to Add Multiple Buttons to SwiftUI Alert
Alerts are a fundamental part of iOS applications. They serve as a way to inform users or capture their decisions. While a basic alert with a single button is useful, there are many situations where you’d want to include multiple buttons.
In this blog post, we’ll focus on how to create SwiftUI alerts with multiple buttons and explain the code behind each step.
Why Multiple Buttons?
Having multiple buttons in an alert allows you to offer users more choices. For example, you might want to let users confirm or cancel an action, or even choose from multiple options.
Basic Setup for Multiple Buttons
Create State Variables
First, create a state variable to control the alert’s visibility.
@State private var showAlert = falseThe @State variable showAlert will control the visibility of the alert. When this variable is set to true, the alert will appear.
Trigger the Alert
Create a button to trigger the alert.
Button("Show Alert with Multiple Buttons") {
    showAlert = true
}
This button, when tapped, sets the showAlert variable to true, which will trigger the alert to display.
Create the Alert
Now, let’s create an alert with multiple buttons.
.alert(isPresented: $showAlert) {
    Alert(title: Text("Multiple Buttons"),
          message: Text("This is an example of an alert with multiple buttons."),
          primaryButton: .default(Text("OK")),
          secondaryButton: .cancel(Text("Cancel")))
}
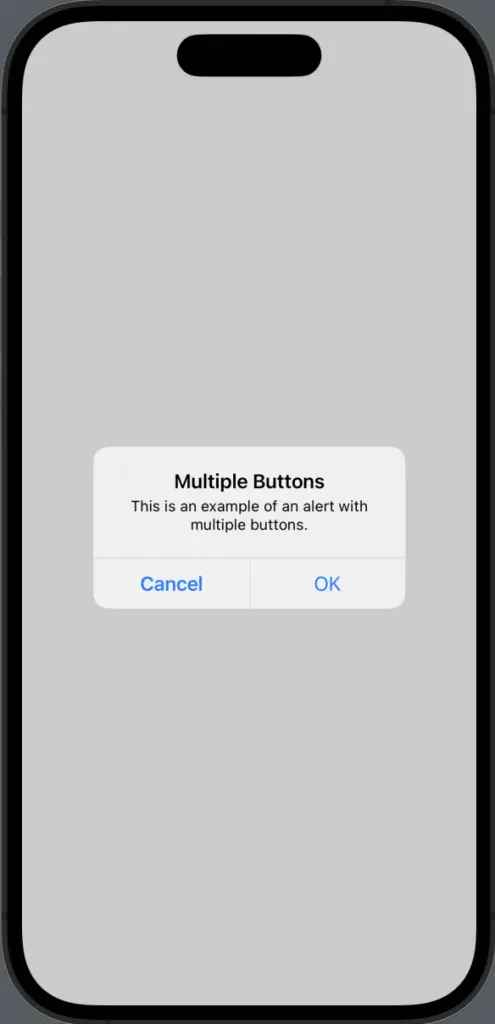
The .alert modifier is used to display the alert. We specify the title and message, and then define two buttons: a primary button labeled “OK” and a secondary button labeled “Cancel”.
Add Button Actions
You can add actions to each button to perform specific tasks.
Alert(title: Text("Multiple Buttons"),
      message: Text("This is an example of an alert with multiple buttons."),
      primaryButton: .default(Text("OK"), action: {
          // Your OK action here
      }),
      secondaryButton: .cancel(Text("Cancel"), action: {
          // Your Cancel action here
      }))
Here, we’ve added actions to both the “OK” and “Cancel” buttons. When these buttons are tapped, the corresponding actions will be executed.
Complete Code
Following is the complete code.
import SwiftUI

struct ContentView: View {
    @State private var showAlert = false

    var body: some View {
        Button("Show Alert with Multiple Buttons") {
            showAlert = true
        }.alert(isPresented: $showAlert) {
            Alert(title: Text("Multiple Buttons"),
                  message: Text("This is an example of an alert with multiple buttons."),
                  primaryButton: .default(Text("OK"), action: {
                      // Your OK action here
                  }),
                  secondaryButton: .cancel(Text("Cancel"), action: {
                      // Your Cancel action here
                  }))
        }
    }
}
Using More Than Two Buttons
Use Alert with ActionSheet
If you need more than two buttons, you can use an ActionSheet instead of an Alert.
import SwiftUI

struct ContentView: View {
    @State private var showAlert = false

    var body: some View {
        Button("Show Alert with Multiple Buttons") {
            showAlert = true
        }.actionSheet(isPresented: $showAlert) {
            ActionSheet(title: Text("Choose an option"), buttons: [
                .default(Text("Option 1"), action: {
                    // Your action for Option 1
                }),
                .default(Text("Option 2"), action: {
                    // Your action for Option 2
                }),
                .cancel()
            ])
        }
    }
}
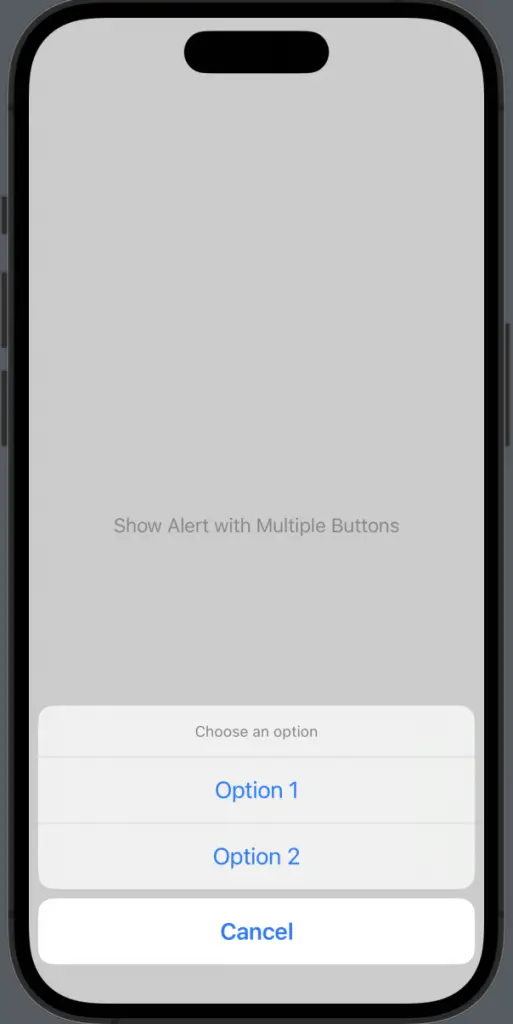
The .actionSheet modifier allows you to add multiple buttons. Here, we’ve added two default buttons and a cancel button, each with their own actions.
Creating alerts with multiple buttons in SwiftUI is a straightforward process. Whether you need two buttons or more, SwiftUI provides the flexibility to customize alerts according to your needs. Understanding the code behind these alerts will help you implement them effectively in your apps.

