React Native API Call Example with Axios, Redux, and Hooks
In this blog post, let’s see how to do API calls using Axios, Redux, and Hooks in react native. As the importance of hooks and proper state management increases, making API calls with hooks and redux is a better way and can be helpful for large react native applications.
Before starting out, please do install following libraries in your react native project.
Redux and react redux libraries are needed for state management. You can install them using the following command.
npm install redux react-reduxNow, install redux thunk using the following command. It allows us to create action creators that return a function.
npm install redux-thunkYou will also need the logging tool redux logger.
npm install redux-loggerFinally, install Axios library to make API calls.
npm install axiosThe installation part is over and let’s move to the coding part.
In this example, what we are going to do is fetch data from API https://jsonplaceholder.typicode.com/posts and show the data in a Flatlist.
Let’s create Action Type file ActionTypes.js as given below.
const ACTION_TYPES = {
  API_PENDING: 'API_PENDING',
  API_SUCCESS: 'API_SUCCESS',
  API_ERROR: 'API_ERROR',
};
export default ACTION_TYPES;
As you can see, we have three action types which give clue about the status of API call.
Next create Action file ApiAction.js as given below.
import ACTION_TYPES from './ActionTypes.js';

export const fetchData = () => ({
  type: ACTION_TYPES.API_PENDING,
});

export const fetchSuccess = (data) => ({
  type: ACTION_TYPES.API_SUCCESS,
  payload: data,
});

export const fetchError = (error) => ({
  type: ACTION_TYPES.API_ERROR,
  payload: error,
});
There are three functions in action file which represent different status of API call.
It’s time to create action creator file ApiActionCreator.js.
import axios from 'axios';
import {fetchData, fetchSuccess, fetchError} from './ApiAction';

const apiActionCreator = (url) => (dispatch) => {
  dispatch(fetchData());
  return new Promise(() => {
    axios
      .get(url)
      .then((response) => {
        dispatch(fetchSuccess(response.data));
      })
      .catch((error) => {
        dispatch(fetchError(error));
        console.log(error);
      });
  });
};

export default apiActionCreator;
You can see, we use Axios here for API call using get method. We dispatch corresponding actions when the API is pending, successful or failed.
Next create reducer file named ApiReducer.js where we define our reducer.
import ACTION_TYPES from './ActionTypes';

const initialState = {
  loading: false,
  data: '',
  error: '',
};

const apiReducer = (state = initialState, action) => {
  switch (action.type) {
    case ACTION_TYPES.API_PENDING:
      return {
        ...state,
        loading: true,
      };
    case ACTION_TYPES.API_SUCCESS:
      return {
        ...state,
        data: action.payload,
        loading: false,
      };
    case ACTION_TYPES.API_ERROR:
      return {
        ...state,
        error: action.payload,
        loading: false,
      };

    default:
      return state;
  }
};

export default apiReducer;
The state consists of three values. The loading is made true when the API is in the pending stage. The data will have the output when the API call is successful and the error will have value when something unexpected occurs.
Create the Store file named Store.js as given below. This is where all reducers and middlewares are included.
import {createStore, applyMiddleware, combineReducers} from 'redux';
import thunk from 'redux-thunk';
import {createLogger} from 'redux-logger';
import apiReducer from './ApiReducer';

const appReducers = combineReducers({
  apiReducer,
});

const rootReducer = (state, action) => appReducers(state, action);

const logger = createLogger();

export const store = createStore(rootReducer, applyMiddleware(thunk, logger));
The redux setup is almost over and now we have to call API in Home.js file.
import React, {useEffect} from 'react';
import {View, Text, FlatList, ActivityIndicator} from 'react-native';
import {useDispatch, useSelector} from 'react-redux';
import apiCall from './ApiActionCreator';

const Home = () => {

  const dispatch = useDispatch();
  const data = useSelector((state) => state.apiReducer.data);
  const loading = useSelector((state) => state.apiReducer.loading);

  useEffect(() => {
    dispatch(apiCall('https://jsonplaceholder.typicode.com/posts'));
  }, []);

  return (
    <View style={{flex: 1, backgroundColor: 'white', justifyContent: 'center'}}>
      {loading ? (
        <ActivityIndicator size="large" color="red" />
      ) : (
        <FlatList
          data={data}
          renderItem={({item}) => <Text>{item.title}</Text>}
          keyExtractor={(item, index) => index.toString()}
        />
      )}
    </View>
  );
};

export default Home;
As you see the action creator is imported to call API. We use dispatch hook of react-redux to dispatch the API call. We use another hook named useSelector to get access the state of redux. So that the data can be easily passed to the Flatlist component.
Finally, wrap the whole code with the provider of redux. The App.js is as given below.
import React from 'react';
import Home from './Home';
import {Provider} from 'react-redux';
import {store} from './Store';
const App = () => {
return (
<Provider store={store}>
<Home />
</Provider>
);
};
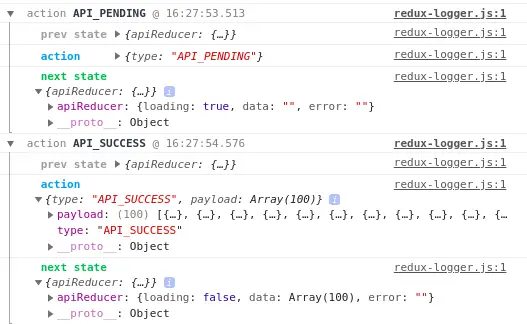
export default App;Now the project is ready to run and debug. The redux logger helps to asses the data and the state through console as given in the screenshot.
Following is the output of this react native redux example using hooks.

I hope this react native tutorial of API call with redux will be helpful for you. You can get all code from this GitHub repository.
thanks so much
This is gold. Much appreciated.