How to Create a Beautiful Custom Bottom Tab in React Native using React Navigation
Bottom Tabs are considered as an important UI element of mobile apps. They help users to navigate smoothly to the top features of the mobile app without hassles. Here, I am creating a beautiful custom bottom tab navigation using react navigation.
React navigation library is the most popular library used for navigation features in react native. You can easily create bottom tabs with react navigation. The advantage is that you can customize the bottom tabs as you want with custom styles.
First of all, set up react navigation on your react native project by following the instructions given in their official documentation. After the initial setup, remember to install the bottom tabs separately using the following command.
npm install @react-navigation/bottom-tabsI also use react native vector icons library in this tutorial to add icons to bottom tabs. Follow the instructions given here to install react native vector icons.
We need to create some sample screens to do navigation using bottom tabs. Create five screens using the following code template.
import React from 'react';
import {StyleSheet, Text, View} from 'react-native';

const Screen1 = () => {
  return (
    <View style={styles.container}>
      <Text>Screen1</Text>
    </View>
  );
};

export default Screen1;

const styles = StyleSheet.create({
  container: {
    flex: 1,
    justifyContent: 'center',
    alignItems: 'center',
  },
});
Like Screen1.js, create screen2.js, screen3.js, screen4.js, and screen5.js. After that, import them to App.js where we define the bottom tab navigation.
You can create bottom tab using createBottomTabNavigator. Make use of screenOptions and tabBarStyle to change the default style of the bottom tab bar.
See the complete code given below.
import React from 'react';
import {View, StatusBar, Platform} from 'react-native';
import {NavigationContainer} from '@react-navigation/native';
import {createBottomTabNavigator} from '@react-navigation/bottom-tabs';
import Icon from 'react-native-vector-icons/AntDesign';
import Screen1 from './Screen1';
import Screen2 from './Screen2';
import Screen3 from './Screen3';
import Screen4 from './Screen4';
import Screen5 from './Screen5';

const Tab = createBottomTabNavigator();

export default function App() {
  return (
    <NavigationContainer>
      <StatusBar animated={true} backgroundColor="#5856D6" />
      <Tab.Navigator
        screenOptions={({route}) => ({
          tabBarHideOnKeyboard: true,
          tabBarStyle: {
            display: 'flex',
            position: 'absolute',
            bottom: 20,
            left: 25,
            right: 25,
            elevation: 5,
            backgroundColor: '#5856D6',
            borderRadius: 30,
            height: 60,
          },
          tabBarShowLabel: false,
          headerShown: false,
        })}>
        <Tab.Screen
          name="Dashboard"
          component={Screen1}
          options={{
            tabBarIcon: ({focused}) => (
              <View
                style={{
                  top: Platform.OS === 'ios' ? 10 : 0,
                }}>
                <Icon
                  name="message1"
                  size={30}
                  color={focused ? 'white' : '#9594e5'}
                />
              </View>
            ),
          }}
        />
        <Tab.Screen
          name="History"
          component={Screen2}
          options={{
            tabBarIcon: ({focused}) => (
              <View
                style={{
                  top: Platform.OS === 'ios' ? 10 : 0,
                }}>
                <Icon
                  name="inbox"
                  size={30}
                  color={focused ? 'white' : '#9594e5'}
                />
              </View>
            ),
          }}
        />
        <Tab.Screen
          name="Create"
          component={Screen3}
          options={{
            tabBarIcon: ({focused}) => (
              <View
                style={{
                  top: Platform.OS === 'ios' ? -10 : -20,
                  width: Platform.OS === 'ios' ? 50 : 60,
                  height: Platform.OS === 'ios' ? 50 : 60,
                  borderRadius: Platform.OS === 'ios' ? 25 : 30,
                  backgroundColor: 'white',
                }}>
                <Icon
                  name="pluscircle"
                  size={Platform.OS === 'ios' ? 50 : 60}
                  color={focused ? '#ff4162' : '#ff748c'}
                />
              </View>
            ),
            tabBarIconStyle: {},
          }}
        />
        <Tab.Screen
          name="Statistics"
          component={Screen4}
          options={{
            tabBarIcon: ({focused}) => (
              <View
                style={{
                  top: Platform.OS === 'ios' ? 10 : 0,
                }}>
                <Icon
                  name="setting"
                  size={30}
                  color={focused ? 'white' : '#9594e5'}
                />
              </View>
            ),
          }}
        />
        <Tab.Screen
          name="About"
          component={Screen5}
          options={{
            tabBarIcon: ({focused}) => (
              <View
                style={{
                  top: Platform.OS === 'ios' ? 10 : 0,
                }}>
                <Icon
                  name="infocirlceo"
                  size={30}
                  color={focused ? 'white' : '#9594e5'}
                />
              </View>
            ),
          }}
        />
      </Tab.Navigator>
    </NavigationContainer>
  );
}
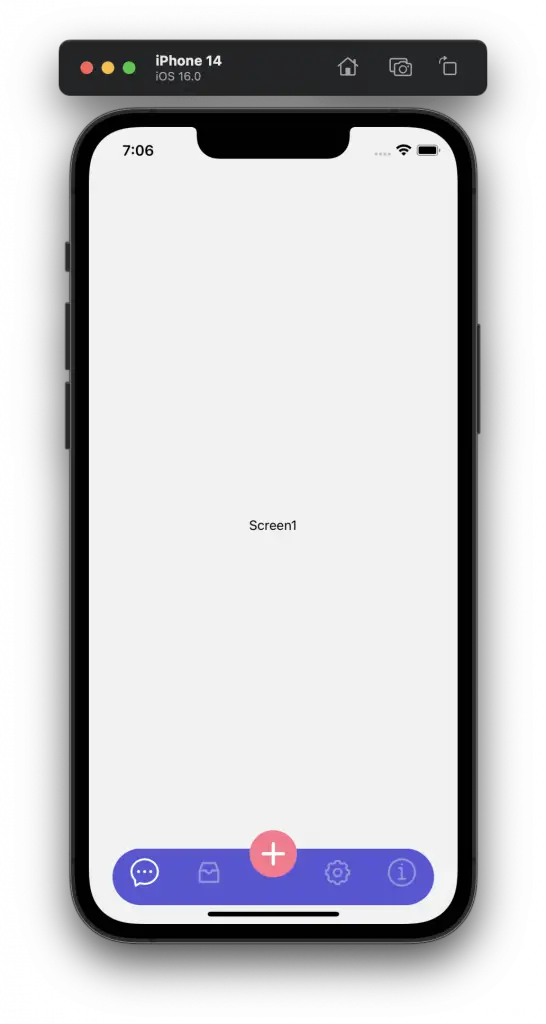
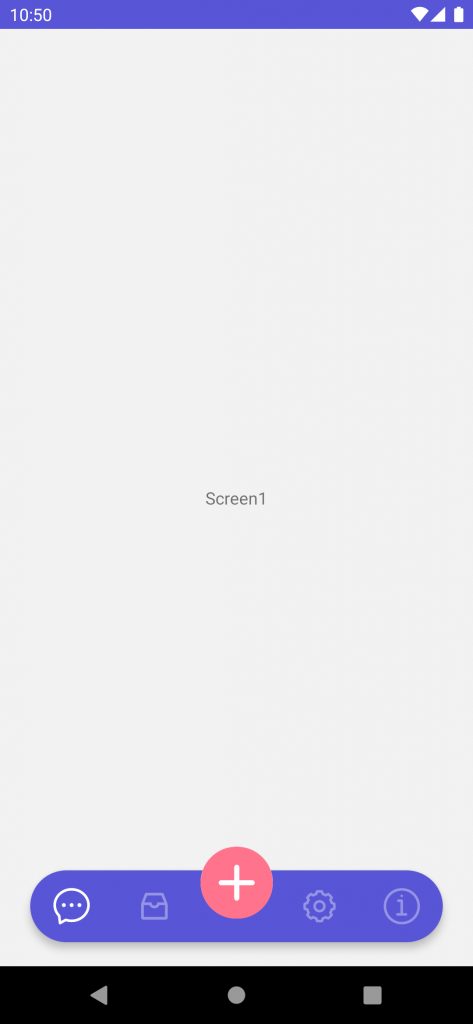
I have made some platform-specific style adjustments to get a uniform result in both Android and iOS.
Following is the output in iOS.

Following is the output in Android.

That’s how you create a beautiful custom bottom tab bar in react native.